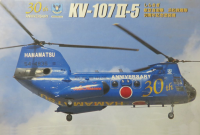
 | KV-107 II-5 "Hamamatsu 30th Anniversary" Fujimi 1:72 kit no: 72111 build time: July 10 2016 - September 3 2016 |
Well, time passes quickly when a friend gets you hooked onto family guy. 4 seasons done, 7 to go. But it does eat away at your bench-time unfortunately.
The good news is that it's a small kit, it's going to be OOB, and Fujimi did a good job so the parts fit is great.
Time for another update I guess, since we're now ready for primer....
First off, the seats and the interior got a wash


Maybe overdid it a bit, but you can't see too much of this anyway.
Then the windows. Fujimi gives you enough flat and bulb windows to fit all 8 windows, so the big question is, which type goes where? The instructions were rather clear on this, but in my opinion didn't match the box art (which appears to be a photo), and so I went with the box art. Which means the front two windows on the right side, and only one window on the left side are bulged. I will need to check the masking tape before I hit it with paint.

Since the windows are glued from the inside I thought I'd better mask it off before gluing the fuselage halves together, just in case I should push one too hard and make it come loose. Like I did with the door...
The seats are weird. You just glue them to the fuselage, and hope and pray they stay somewhat level since there's no supports or anything. Now if you'd want, it'd be easy to scratchbuild some support struts. I'm lazy on this one.

And after gluing in the cockpit

And yes, that rear bulkhead is glued in the wrong way around. *sigh*. It won't be the last mistake I make on this kit....
Fortunately, you wont be able to see the bad side of that bulkhead. The one with the ejector pin marks...

I hope.
Then the blades. Black, white, yellow, more black, and then the silver paint. Looks good enough to me [smile]

And one last shot before closing her up


Mistake #2. While playing around with a little superglue, part of it leaked out through that opening. Nice fingerprint, don't you think...

Looks worse that it actually is. Especially since I won't need to clean up the spine - there's another part that's going to be covering all that.

See...

Brilliant engineering I would say!
Some sanding on the bottom, and some silver paint to check the seam. A handful of tiny spots, but overall, great job Fujimi.


And then the glasswork. Notoriously evil on helicopters. But first - the first and only part I found with some flash on it....

Get rid of the stubs, mask it off, fit into place and glue. Nice fit....

And the front glasswork as well. Took some time to properly mask this thing, as you might imagine.

But it fits great. No extra work needed I believe.

And then we enter the realm of faux-pas #3 for this update. The sponsoons for the landing gear were glued on, and then some triangular parts on the fuselage.
Good thing I drilled some holes before gluing together. Looks good, doesn't it?

Woops

They're upside down, and I couldn't pry em loose again. They're supposed to hold some support struts to those sponsoons. I'm gonna go the chicken way here
and just leave them off. The struts aren't included anyway, Fujimi would have you use some sretched sprue.
And woopsie #4 was right around the corner, as I broke the fragile part that holds the winch above the door. Easy way out: just leave it off [smile]
It's a SAR chopper which really can't go without, but this is my world after all. On to the primer coat.
| previous page | next page |